
Ever wondered how to grow garlic? You’re not alone! Garlic is a kitchen staple in homes across the USA, and it’s never been easier to grow your own. How? Well, it’s true when they say timing is everything. Read on to learn the best way to grow a garlic patch that will last you year-round.
First Things First: Shelf Life
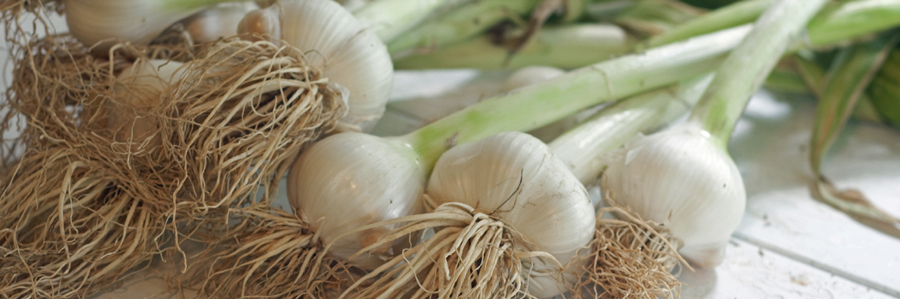
In the grocery store, garlic is already at or near the end of its life and is drying out. (HOT TIP: If it’s covered in plastic, it is suffocating!) Garlic has to breathe. Cloves of not-so-fresh garlic will be drier, or in some cases moldy, and will not have the flavor necessary to make your culinary creations shine. Plant garlic September through December, depending upon where you live. Don’t harvest until about July. Though you can harvest young bulbs in early spring before the cloves have developed. You can sauté them or use them the same way as green onions.
Top-Setting vs. Underground Garlic
No, we’re not talking about black market garlic here. We are talking about growing flowering garlic as opposed to growing garlic plants that don’t flower. Most of the garlic you find in the plastic packages in your grocery store is underground garlic. The stores carry this type because it is easier to cultivate and harvest. Underground garlic does not flower and does not yield a tall stalk that gets in the way of harvesting. It also has a thicker, more protective papery covering that withstands the rigors of shipping. AND storage in full light in the produce aisle.
Top-Setting Garlic

Top-setting garlic is called ‘hardneck’. It produces a stalk with tiny bulb-lets, called bulbils, that will drop off and scatter if not harvested. Some of these will grow again. Harvest the bulbils when you see them start to drop to control crowding. Overcrowding will result in smaller bulbs. You can keep them to plant for next season’s crop or give them away to your friends and family.
Top-setting varieties, such as our Music garlic, are said to have a richer and more pungent flavor with easier-to-peel cloves, although the individual cloves may not be quite as large. The cloves will also have a decidedly purplish cast to them, while the entire bulb may still have a white, papery wrapping. The top-setting garlic plants will produce the useable garlic underground, just as underground plants do. Some home gardeners prefer to have a visible signal as to the progress of their plants, which is why top-setting varieties are more popular with grow-it-yourselfers and, as stated above, the flavor is said to be superior.
Underground Garlic
Underground garlic, like our Elephant Garlic, is ‘softneck’ garlic. They rarely produce a tall flowering stalk. But a shorter stalk with leaves will be present. Underground garlic produces large bulbs. They usually have larger cloves than top-setting garlic. They’re wrapped in light-reflecting, protective white papery skins. These are the cloves that are mass-produced for the grocery store, the spice manufacturers, and the pickle producers. Due to the thick, dry, papery wrapping, these cloves are also more difficult to peel and may need more per recipe than top-setting garlic.
If you want to know how to grow garlic and are unsure of which garlic to plant, plant both. You can then determine which grows best in your climate, and you will be able to do your own taste tests. Gourmet chefs will use both kinds in their kitchens and will grow both in their gardens.
A quick note: Top-setting garlic is also known as bolting garlic. While underground garlic is considered non-bolting.
When and Where to Plant Garlic
 You can plant garlic in the spring, but the best results happen when it is planted in the fall. Fall planted garlic is harvested in late June through August, depending on where you live. For example, in far northern climates you will most likely be planting in late September or early October to beat the heavy frost. Then harvesting in July or August once the summer heat has matured your garlic crop. See more information on how to plant garlic in the fall.
Garlic’s natural habitat is in cool, moist soil and the longer it is there, the better it will be.
According to the experts, garlic needs the wintertime cold and moisture to produce the best-tasting, most filled-out bulbs. Too little moisture and too little time in the ground will result in smaller, less plump-looking, dry bulbs. This also affects the flavor and the shelf life.
Till your soil to provide the best growing environment. Garlic prefers sandy, silty loam with exceptional drainage. If you live in an area with heavy clay content, you will either want to amend your soil or plant in a raised bed with amended soil at least 12 inches deep. Under ideal soil conditions, garlic roots can grow up to 3 feet deep. You will want to plant your garlic where it will receive at least 8 hours of full sunlight daily.
How to Grow Garlic: Which End Is Up?
Almost everything you read will tell you to plant the rounded (root end) down and the pointed (sprout end) up. Regardless of how the cloves go in the ground, the roots will grow from the root end and the sprouts will grow upward, toward the sun. What we can’t see under the ground? Through the natural process of the soil’s expansion, contraction, settling, etc., the clove will right itself to the proper growing position. Meaning that if you are planting a large crop, plant your garlic sets in the way that is easiest for you to do it.
Rows & Spacing
Plant garlic between 2 and 5 inches deep. Rows should be about a foot apart, allowing you the space to walk between them for weeding. The space between the individual plants only needs to be about 6 inches. Since you are planting large-sized cloves and not seeds, you will not have to go back and thin them afterwards. A note on weeds: cultivate the garlic until the snow starts falling or until winter sets in. This is when the roots are first becoming established and it is most important to reduce the competition for nutrients. Mow the weeds down as short as possible before the first shoots start to appear above the ground in early spring. Keep the weeds under control as best you can.
Feeding
Garlic is a heavy feeder. It will do best if you prep the furrows with a high phosphorous fertilizer before planting. We like Triple Super Phosphate. Growers have also reported exceptional results with all-natural fish emulsion plant foods. Like Neptune’s Harvest. Bone Meal, which provides phosphorous and nitrogen, is then side-dressed in early and late spring. Stop fertilizing in early June when the heat and moisture have signaled the cloves to start swelling.
Watering
Garlic needs a fair amount of water, as well. It’s best to water very well every 10 days to 2 weeks, allowing the water to soak down at least a foot. If your area has particularly hot summers or has been experiencing severe drought, you may have to water once a week. Proper irrigation is most critical in early June. This is when the cloves are swelling, helping them to maintain their high moisture content for better size and flavor.
Harvesting
 You’ll get no above-ground sign that your bulbs are ready to harvest. You will have to dig down to take a look at the bulbs to see if they are ready. Getting them out of the ground takes a little practice, but it’s fairly easy. Remember that the roots go deep, so you’ll be cutting the roots off below the bulb. A sharp, hoe-type implement will work best. You can work each row by hoeing and cutting below the bulbs. Then going back and pulling them from the ground. Lay them all facing the same direction so the stalks don’t become tangled. This is particularly important if you will be braiding and/or hanging your garlic plants to dry before storing.
Harvesting when the ground is a bit dry is also easier and will result in less drying time. Drying should take place in a well-ventilated, shady, warm and dry area. It usually takes two to three weeks. This process further matures the bulbs, as well, and will greatly increase their shelf life. Some people set up drying racks or screens, while some braid the stalks and let them hang. Try to avoid bruising the bulbs in any way; this shortens the shelf life dramatically.
How to Grow Garlic: Storage
Store fresh garlic in a dark, dry and well-ventilated space, protected from high humidity and freezing. Cooler temperatures combined with humidity will result in sprouting. Remember: garlic needs to breathe. Do NOT store in plastic. Stored properly, garlic should last on the shelf until your next harvest. This is not true of grocery store garlic, as the storage and distribution system will not accommodate garlic’s ideal needs for long-term storage. It is also true that after 6 months the flavor may not be as pungent.
You can dry your garlic and crush it into garlic powder. It can also be stored in oil in the refrigerator for a few months. But discard it if any sign of mold or yeast appears on the container or on top of the oil. You could also puree and freeze it by mixing one part garlic to two parts oil. Or chop and wrap it tightly in a freezer bag or plastic wrap. You can freeze unpeeled garlic and remove the cloves as needed. Canning is not recommended due to the high temperatures required to kill botulism. The airless environment created in oil is also ideal for growing this bacteria, which is why it should never be stored in oil at room temperature.
This may all sound complicated, but the truth is that garlic is fairly easy to grow. We just wanted to give you as much information as possible. There is no comparison when it comes to homegrown fresh vs. grocery-store aged. None!
Interested in growing your own patch? Check out our selection here, and get growing!
No Comments