
So you’ve grown a great crop, but once it comes time to pick those tiny cabbages off of the little tree, you’re probably wondering exactly how to harvest Brussels sprouts. It’s a great reward to feast on your own homegrown produce long after summer has ended. And what better way to enjoy a chilly fall evening than a dinner that includes your garden’s goods?
Brussels Sprouts are packed with antioxidants (the cancer-fighting components in foods) and nutrients. They’re a cruciferous vegetable, like cabbage, kale, cauliflower and broccoli, and they’re equally versatile and simple to prepare. Plus, they’re cute, resembling miniature heads of cabbage.
Since Brussels sprouts ripen late in the season, they’re the perfect vegetable for fall meals. They are hearty and can withstand cooler temperatures than most veggies, and even some frost.
How to Harvest Brussels Sprouts
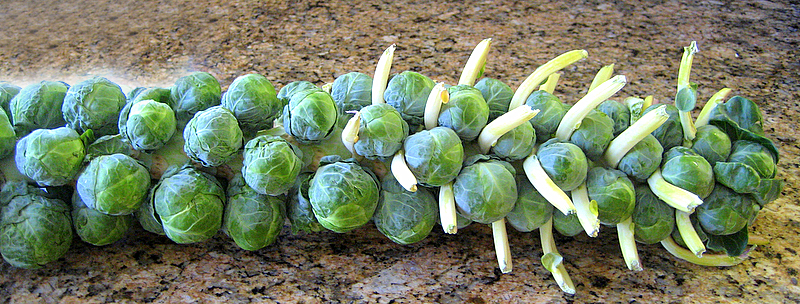
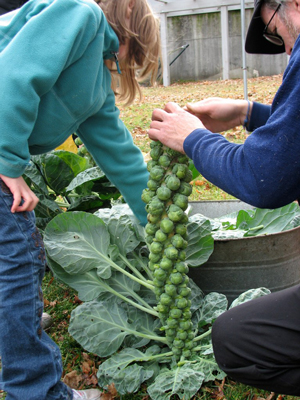
Harvest the bottom sprouts from stalks first, as they’ll be the ripest, and work your way to the top. When ripe, they should be approximately one inch in diameter and have a firm texture. With a sharp knife, cut straight across where they join the upright woody stem. Most plants will produce 20 to 40 sprouts and will grow 2 feet tall or more.
Preparation and Cooking
Before cooking, thoroughly rinse the sprouts to make sure there are no insects living in the outer leaves. Cut off any tough stems and to allow the heat to absorb more uniformly, cut an X in the bottom of the sprout. They are usually cooked and served whole. They’re delicious hot, but also are a great addition cut into quarters and mixed into cold salads.
 The entire sprout is edible and tender when cooked. You can simply steam them plain and enjoy their strong, nutty flavor with no seasonings. That’s also thought to be the healthiest preparation, as it helps the sprouts retain the most of their phytonutrients. Don’t overcook, or they’ll become limp and flavorless.
Remove from heat when they reach a semi-soft texture and the color changes from bright green to a more subtle olive-green hue. You can slow cook them in a saucepan with a little butter, or you can oven roast them with olive oil to caramelize their outsides for a rich, sweet flavor. Pretty much any flavors and seasonings that complement the other cruciferous veggies will work with Brussels sprouts. Who could resist any vegetable drizzled with a creamy cheese sauce?
A classic method of preserving Brussels sprouts for winter eating is pickling. There are so many ways to pickle. From traditional sterile canning to faster, more modern techniques. And from basic dill flavors to exotic vinegars to sweet marinades. Store them long-term or eat them within a few hours, depending on your needs.
You can dry Brussels sprouts in a food dehydrator for a quick and healthy snack. Or blanch and freeze them to store over an entire season. Cut entire stems with sprouts from the garden and store them short-term in a root cellar. Or in small containers with proper ventilation.
Because of Brussels sprouts’ strong flavor and tendency to get limp, canning isn’t the most popular method of preserving. Freezing and drying are more common. If you have a huge haul of sprouts and enjoy canning, you can experiment with pickling seasonings, to make a superb relish or cold side salad.
No matter how you choose to serve them, make sure you give yourself a giant pat on the back for growing and serving your very own garden bounty!
Happy gardening!
No Comments